+86 15898932201
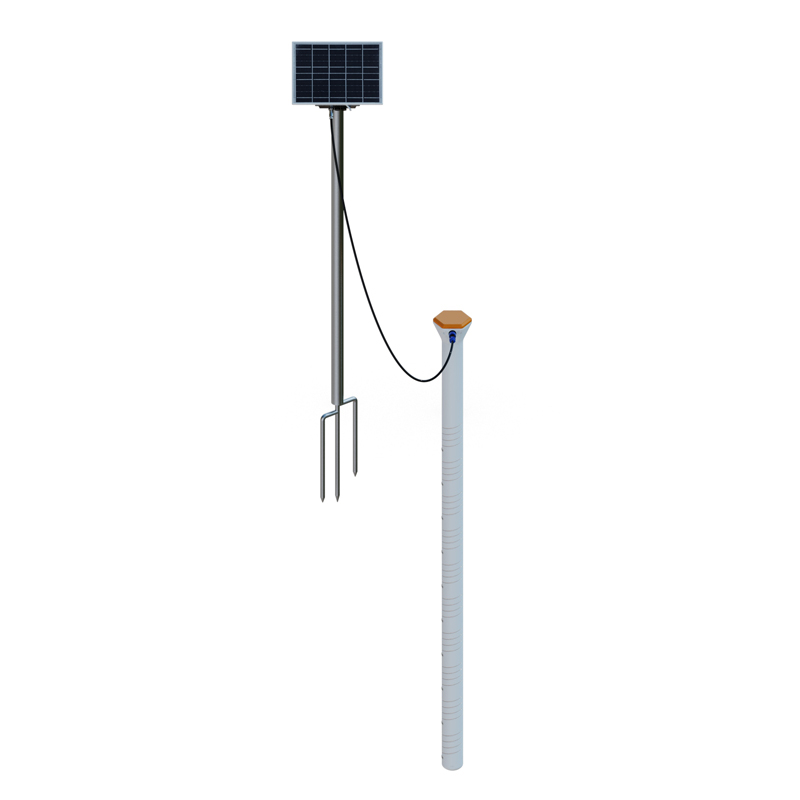
Automatic soil moisture monitor
Model:FT-GTS10
Brand:fengtu
 Get a Free Quote
1. Product introduction of Automatic soil moisture monitor
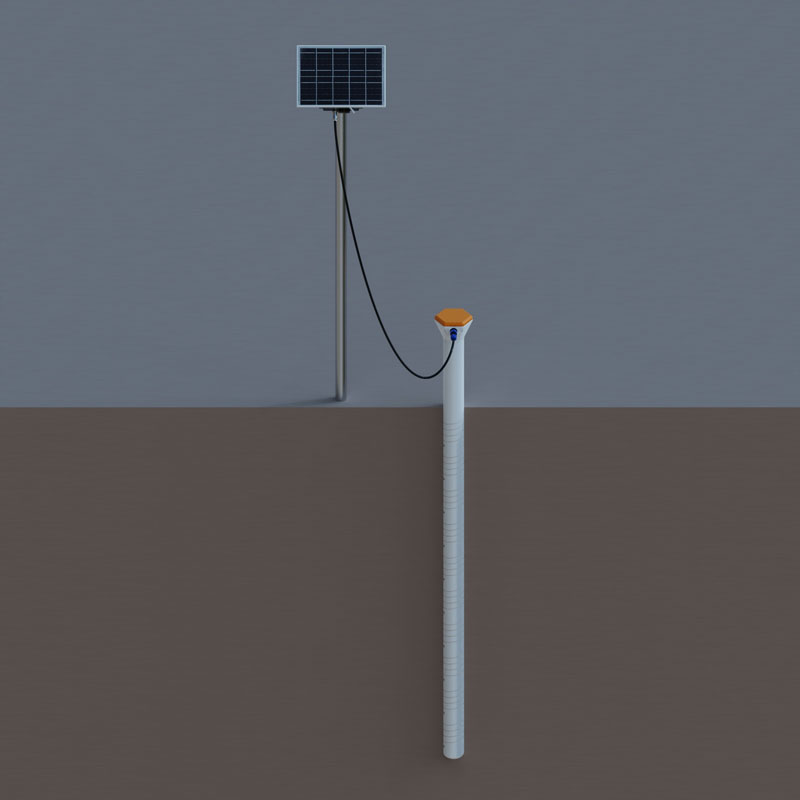
Automatic soil moisture monitor can collect three parameters of soil temperature, soil moisture and soil conductivity, and measure 10 soil moisture parameters at the same time.Automatic soil moisture monitor is an online monitoring device used to monitor soil profile temperature, soil profile moisture, and soil profile conductivity.It integrates soil temperature, moisture, and conductivity and can be widely used in agricultural engineering fields such as smart greenhouses, smart orchards, and smart irrigation.
2.Automatic soil moisture monitor product parameters
Solar panel power: 8W
Solar panel standard working voltage: DC5V
Built-in lithium battery capacity: 5000mAh
Sensor startup time: 60S
Sensor power supply voltage: DC12V
Sensor supply current: 22mA
Sensor power consumption: 0.26W
Communication method: 485 Modbus RTU protocol
Measurement parameters: 10 layers can be measured simultaneously
Measurement principle: Establish a mathematical model by measuring the soil dielectric constant, and design a spiral measuring electrode to measure soil volume moisture content data.
parameter | Measuring range | Accuracy | resolution | unit |
soil temperature | -30~70℃ | ±0.3 (-10~70℃) | 0.01 | ℃ |
soil moisture | 0~100% | ±3% (loam soil) High organic matter soils (soil organic carbon content >12%) High clay content soils (clay content >45%) May require calibration for specific soil types due to their dielectric relaxation properties | 0.1% | --- |
soil conductivity | 0~20000us/cm | ±3% (0~10000us/cm) ±5% (full scale) | 1 | us/cm |
3.Advantages and features of Automatic soil moisture monitor
★A single soil tube sensor can measure soil parameters at multiple depths at the same time, and the monitoring depth can be customized (less than 1M).
★The sensor adopts low-power design with power consumption as low as 0.26W, which is suitable for long-term unattended monitoring in the field.
★Each layer of the sensor can independently measure temperature, humidity, and conductivity parameters.
★The sensor shell is made of imported PC material, which has high strength, corrosion resistance and no pollution to the environment.
★The sensor’s waterproof level reaches IP67, suitable for long-term outdoor monitoring.
★The sensor measures the average humidity in a certain area, making up for the limitations of single-point measurement.
★The sensor adopts a self-designed spiral measurement electrode to improve the contact between the sensor and the soil and try to avoid measurement errors caused by air gaps.
4.Precautions for using Automatic soil moisture monitor
a.The sensor should be used strictly in accordance with the installation instructions.
b.When multiple sensors work at the same time, they must be separated by a distance of more than 3 meters.
c.Due to the limitations of the sensor measurement principle, there should be no interference from electromagnetic cables and strong magnetic radiation within a 3-meter central radius of the sensor measurement location to avoid huge errors and damage to the sensor measurement.
d.The installation environment of the sensor should comply with the measurement range of the sensor to avoid irregularities such as over-range.
e.The sensor should be installed away from strong acid, strong alkali, heavy oil and heavy metal environments.
f.The sensor is a soil measurement sensor.It is prohibited to use this sensor to measure other substances.
g.The sensor installation environment must not have strong vibration.
h.The sensor cannot be subject to excessive external force.
i.Disassembly is prohibited.Unauthorized disassembly is considered a non-compliance and no further services will be provided.
5.Automatic soil moisture monitor structure diagram
6.Automatic soil moisture monitor dimension diagram

7.Installation method of Automatic soil moisture monitor
Drilling method:
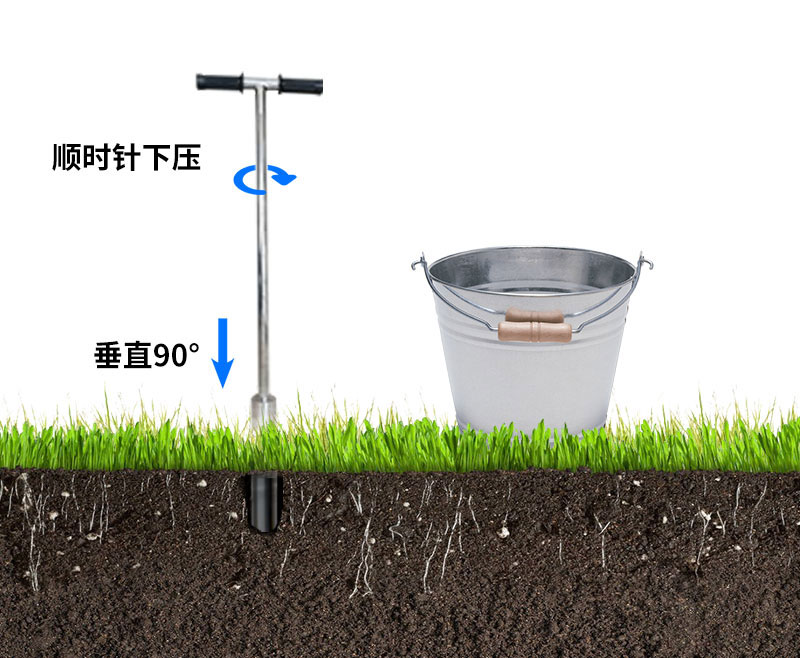
1.Get the soil drill bit, handle, and support rod.After completion, place the soil drill vertically on the ground.Hold the handle tightly with both hands and press down clockwise to turn it slowly.(Note: Don’t use too much force, and be sure to turn it slowly and several times to prevent the drill bit from wandering and causing the hole to become crooked)
2.Take out the soil auger from the hole, put it into a basin, and use the tool to collect the drilled soil into the basin for mixing with mud.(Note: The first drilling soil will not be collected because there are too many impurities)

3.Repeat the above-mentioned drilling and soil removal, and during this process, try to gently put the sensor into the hole (do not touch the device to the bottom with force) to test whether the depth of the hole is appropriate; if there is any lag, then Use an earth drill to make corrections to ensure that the sensor is put in and taken out smoothly; until the hole depth is flush with the installation position marked by the sensor (zero scale line), the drilling is completed.
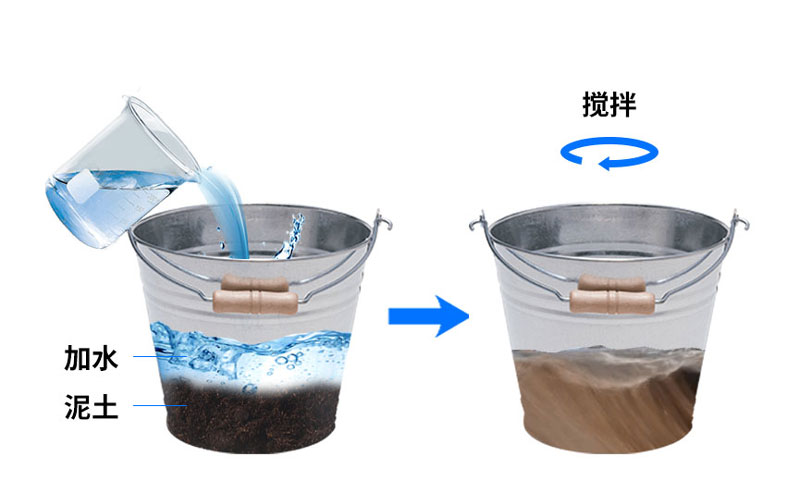
4.Pick out soil impurities in the pot, such as stones, roots, and hard-to-dissolve soil clods.Grind the soil finely to mix it with the mud.
5.Pour in an appropriate amount of water and stir thoroughly until it becomes sticky; loam mud should generally not be thicker than "tahini".
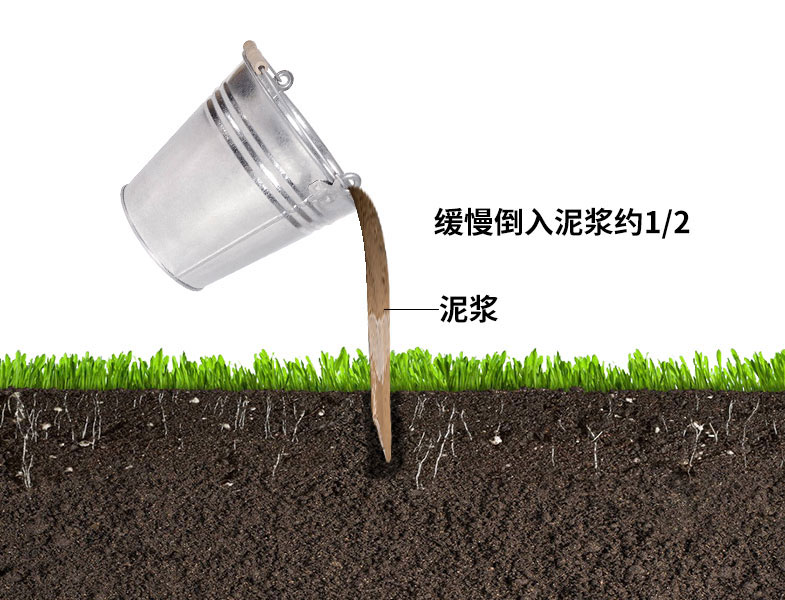
6.Slowly pour the mud into the hole to about 1/2 of the hole; it can be increased or decreased according to the actual situation.
7.Slowly put the sensor into the hole, turn it clockwise and press down.If the speed is too fast, the air bubbles may not be completely discharged.(Note: Do not pull up the sensor while turning and pressing down to prevent gas from being sucked into the hole again)
8.When the sensor is installed to the correct depth, some mud will overflow around the equipment and grouting is completed; at this time, the sensor installation depth is flush with the hole.(Note: Remove excess mud beyond 3CM around the sensor to prevent clumping and affecting water penetration)
Burial method: Use a pickaxe to dig a deep pit to bury the sensor, and bury the sensor with mud.For details, refer to the drilling method.
Article address:https://www.sqqx.net/en/Soil-Moisture-Meter/Automatic-soil-moisture-monitor.html